

Sunday, December 25, 2011
Monday, December 19, 2011
December Daily 2-6 (long post)
I am still around. I have been having A LOT going on lately and I have decided to not let it get to me this year, and just let some things go. Unfortunately, this means some crafting projects are being left in the dust, which means less things to blog about. I assure you, I have not foresaken my faithful readers, I have just chosen to not feel guilty about the things that I can't accomplish this year and focus on the more important things, such as spending more time with my family. A surgery and a couple of illnesses have really taken its toll this December.
As you can see below, my DD is only up to page 6 and on my last check, today is the 19th. I have accepted the fact that this album won't get finished until sometime in January, but I am okay with that. Right now, making these memories are more important to me than recording them. Sorry about the quality of some of the pictures below. It is a bit overcast here and even without the flash on some of the page protectors reflected the glare.
First page up is day 2, making Snickerdoodles for the first time ever. I used a 6.5 x 5.5 photo on the left and a 4x6 on the right. This was the first time I used a self-timer to get a photo of myself and I must say I am pleased with the results.

The transparency in the middle was cut to size and layered with the canvas letter stickers.

Day three is all about my dh putting up our tree. I used a full page photo on the left and made a photo collage for the right. I also added tinsel trim to the edge of the left page to add some sparkle. The title was place directly on the photo along with the number coaster.

This next page was inspired by one of Ali Edwards pages that she did recently. I had been saving all of my shopping receipts from the holiday season and I even had a few photos of some of the places I went. The journaling was typed, printed, then I went back over it with stickers on certain key words.


Day 5 is our tradition of buying a new ornament each year. The one chosen this year was the tiger because of LSU's SEC championship. I had to order it and get it personalized.

The middle piece is a transparency with a heart doily stapled to it. I then stamped and punched out the circle embellishment and glued it to fit over the angel tag. I then added a word sticker to the piece.
The right side of the layout is the story of the angel ornament that was given to us by a grandmother who is no longer with us. I wanted this story documented so that my daughter will always know where it came from and why it is so important to us. The angel card was stamped with AE DD stamp set and sewed to the page. I sewed lots of little details on to my pages this year. I love the homemade feel it gives to my pages.

Okay, this next layout brings out my redneck side, but it was definately a tradition that I wanted documented in my book. On the left, I scanned and enlarged the dvd case into a full page photo. I then used the Silhouette and one of Kerri Bradford's files to cut the divider in the middle of the layout.

On the right, I typed out my journaling and cut it into 1/4 inch strips. I used white on white for a monochromatic look. I then added a tiny polaroid photo of our Christmas dvd collection. The title letters were added directly to the page. And of course, this story would not be complete with the line, "Shitter's full!" Sorry if this offends anybody, but that really is an important part of the story.

So, there you have it. My attempt at having a sane holiday while still getting a few crafty things done. If by any chance I don't make it back here before the holidays are over, I wish you all a very merry, little Christmas and a safe passage into the New Year.
Wednesday, December 7, 2011
December Daily - Day One
Let's start today with a look at what my desk looks like while I am working on this December Daily. I really tend to scrap everywhere and I actually cleaned off the back table before I took a shot of this. I couldn't have it look like I was a complete mess. :)

This is my first DD and I am one of the SC subscribers ex-subscribers, that still hasn't received her album yet, so I really had no motivation to begin this project. I pretty much decided to copy Ali Edwards idea for the first page of my book. I used a baseball card sheet protector that I cut down to size. Once I filled up the little pockets, I sewed them shut to keep things in place.

This is the back side of the sheet protector and the first page of my book, which will eventually have a short intro to my DD on it.

Day One of my book is a large photo of us before we went out for our new tradition. The left side is a border punched pocket page which holds the journaling of our new tradition and why we decided on it. Since I didn't have a binder yet, I forgot about the holes, so I had to improvise. I cut two 1 inch by 8.5 inch pieces of transparency. I butted them back to back and stapled them along the edge of the page. One the front page, I glued a piece of trim to cover the staples, but in this view I left them show.

Monday, December 5, 2011
Advent Tags/Tree
Really, is it December already? I can't seem to keep track of time lately. The holidays are fast approaching, there is shopping and wrapping to be done, and lest not forget the cooking, baking, and celebrating with family and friends.
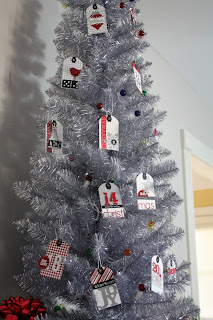
Today is a quick look at my advent tag tree that I created using Kerri Bradfords studio cut files. Some I followed exactly and some I changed up using supplies that I had on hand. My daughter is older now, so I felt this year was in need of a few changes to some of our holiday traditions. Instead of the usual 24 little boxes filled with candy or small trinkets, I created the numbered tags which each coordinate with a gift under the tree. One for each day.
Here is a look at the tree and a couple of the tags that are on it. Sorry if the photos are dark. I don't get much light in my living area.


We also started another tradition this year, which included getting dressed up and going to a nice restaurant on December 1st to ring in the holiday season. It was great!! What new traditions are you starting this year or what old ones are you bringing back?
Wednesday, November 30, 2011
Workdesk Wednesday
Okay, so this is a bit of a cheat, because this was my work space last Wednesday. I was busy making cards that I could send to my Godchildren throughout the month of December.

Here are two of the cards that I made that day. I kept it simple by using an embossed background and some $1.00 Studio G stamps. I added a little touch of glitter for some sparkle and a small pom-pom for the perfect finishing touch.


They are young and I try to send out a card each week, so keeping them simple is a must. They love getting mail and usually always write back; something many kids don't do anymore. If you have any ideas, please share. I could use all of the inspiration I can get. My goal is to have them receive 52 cards for 2012. Am I crazy or what? Please don't answer that. lol...
Monday, November 28, 2011
The first of many...
This is the first project that I completed for this holiday season. My sister's both came in for Thanksgiving, and I wanted to give them a little something to take back home with them. I filled two jars that I bought from Wal-mart with their favorite candy. I used my much beloved Silhouette to cut out the vinyl snowflakes. I adhered one to each of the four sides, added a sheer red bow, some jingle bells, and a circle of decorative paper on the top. A quick and easy gift for each of their homes or office.


I am planning on going back and get some more jars for some of my daughter's co-workers. I think this would also make a cute gift for teachers. So, what have you made so far this season?


I am planning on going back and get some more jars for some of my daughter's co-workers. I think this would also make a cute gift for teachers. So, what have you made so far this season?
Monday, November 21, 2011
Make A Wish...
I needed a childs' birthday card for this week and so, why not make two while the supplies were out? I used scraps leftover from an October Afternoon kit. The candle and the balloon were cut on the Silhouette. I then pop dotted the balloon for dimension. The sentiment is a Michael's $1 stamp and each card was accented with either rhinestones or pearls. Easy peasy!!


It felt great to back in the craft room this weekend. I did get a few things done and a lot of other things started. I'll be back later this week to start sharing my holiday goodies.
Friday, November 18, 2011
Thankful for...
After a couple of weeks of everyone in this house being sick, I finally sat down last night to create. I saw this sketch at Sketchy Thursdays. It is for their December Guest Design team challenge.
While I am not trying out for the team, I wanted to use the sketch because I liked that it had clean and simple lines. I used it to create the layout "Thankful for Us". Now that everybody was feeling better, and off to school/work, I wanted to create something quick and not have to think about it. I followed the design pretty much to the letter.

I don't have many pictures of me and my hubby together, so I was glad to have these even though the quality wasn't the best. By printing them at the smaller size, it worked out great for me and for use with this sketch. I used part of a song for my journaling, and added stamped accents for my page elements. Even with the sewing, this layout was pulled together in about 30 minutes.
Sometimes, using a sketch is just what you need to get your creative juices flowing again. I just wish I had the energy to do more.
Tuesday, November 15, 2011
Sick, Sick, and more Sick
Right now, I am so sick of the sicknesses going on in this house. I think I am going to scream!!
We had two doctor's appointments just this morning. Dd hasn't been to school since last Thursday and there is definately no creativity going on. Colds, and viruses, and sinuses, oh my!!
Vent over....thanks.
We had two doctor's appointments just this morning. Dd hasn't been to school since last Thursday and there is definately no creativity going on. Colds, and viruses, and sinuses, oh my!!
Vent over....thanks.
Wednesday, November 9, 2011
Boom Pow Bam - Sketchy Thursdays
I am playing along again this week at Sketchy Thursdays. This sketch was so much fun to work with. I had a blast using the inks and mist to create this layout. I cut the word bubble stencils using my Silhouette. I tacked them down with temporary adhesive, sprayed with mist, then inked the letters black. If you try this, remember to tape off the letters before you mist.


I can't believe how quickly this page came together for me. I had it from start to finish in less than an hour. Even with the stitching and the cutting of the stencils. And I must say, I love it!! Doesn't happen often, but when it does, it feels so good.
Tuesday, November 8, 2011
Have Yourself...Frame
Remember the black frame that I spray painted white?


So, what do you think? Not bad for a $1 frame.
Monday, November 7, 2011
December Daily Demystified
Last Friday, I was sitting at my desk, staring at this pile of embellishments. You see, I want to do my first December Daily, but I didn't know how to start. I usually start a layout with my photos first, so without pictures, I was lost. I posted over on Two Peas and it seems like I was not the only one with the deer in the headlights look on my face. Others were also having the same problem.
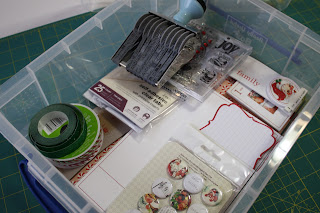
Well, one sweet lady, Shimelle, answered and gave me the most wonderful advice. She said to cut my base pages, make a few embellishments, and then put the pages together as I print my pictures. Light bulb moment!! I printed and cut my pages, sorted through and chose the embellishments I wanted, and pulled a few stamps and such to use. Finally, the clouds were starting to part, and I didn't feel so overwhelmed anymore. This was something I could actually do.


Well, one sweet lady, Shimelle, answered and gave me the most wonderful advice. She said to cut my base pages, make a few embellishments, and then put the pages together as I print my pictures. Light bulb moment!! I printed and cut my pages, sorted through and chose the embellishments I wanted, and pulled a few stamps and such to use. Finally, the clouds were starting to part, and I didn't feel so overwhelmed anymore. This was something I could actually do.
This is the whole kit that I pulled together.

This is the papers that I am using, cut down to 6 x 8.5.

I put everything in this clear storage box from my local office store.

I guess the purpose behind this story is no matter how many years you have been doing this, how experienced you are, and no matter how many classes you have taught, you can still always learn something from others. So, if you have wanted to do a December Daily and didn't know where to start, my best advice is to stop over thinking it and just do it the way it works for you. Good Luck!!
Friday, November 4, 2011
Sugar and Spice
And no, I am not talking about the Gingerbread Spice latte's from my local Starbucks. Although, they are mighty tasty. lol... I am talking about my sweet girl. Hard to believe she will be 18 in just a few months. After this past weekend, with everyone telling her that she was just like her Aunt, I wanted to create a layout to let her know that she should not forget to just be herself.
I used the Farmhouse collection by Crate Paper ( I just "heart" this collection). Everything came from that kit except for the little brown block with the leaf punched through it. I then stitched around the page and through some of the elements to give it a homemade look. I love how it turned out!

So, hug those babies because ladies (or Gents), they really do grow up so fast. Now, I am off to finish my latte. :)
Wednesday, November 2, 2011
Welcome Fall - Sketchy Thursday Challenge
This week, I decided to play along over at Sketchy Thursdays. I fell in love with the sketch almost immediately. I knew that I wanted to use it, but when I sat down to make a page, a card popped into my head instead. I decided to just go with it and this is what I came up with.


I used an orange enevelope instead of a photo for my base. I then added the title on top, instead of behind, the envelope. This card came together really quickly, thanks to this sketch. I think next time I use it, I will try it as a page.
Tuesday, November 1, 2011
I've Been Framed
Okay, so maybe my title is a little bit corny, but this project is not. I happened to find this frame at a local Dollar Tree store, and immediately, I thought of all the interest in printer trays and that I could probably do something similar with this. I bought a few and headed home to see what I could create.
This tray was done very simply, just so I could see what things could be used inside of the glass. I used regular pattern paper, layered them with stickers, and added chipboard pieces.

It was thick enough to hold chipboard shapes without giving me any trouble to put the backing back on. The backing itself contains two different hangers and an easel for easy display options.

They only come in black, but with the many colors of Fusion spray paint, I was able to paint this one white for use in a Christmas one I am hoping to get to this week.

Using this collection from Teresa Collins. I plan on leaving the glass off of this one so that I can load it with thicker goodies, such as my holiday yo-yos and those popular paper rosettes.

Monday, October 31, 2011
Happy Halloween
Welcome Gals and Ghouls!! Just a little wish for your Halloween day.

Happy Halloween!!!
I hope your day is filled with lots of treats and not any tricks.
I'll be back tomorrow with a goodie that will surely satisfy your craving for creativity!
Until then...
Tuesday, October 25, 2011
Halloween 2
This, was the second card that I was working on, that helped to create the mess that was on my desk. If you remember seeing it with a different sentiment, you are correct. There was something about it that I didn't quite like, so I had to remove it and try again. This version I like much better.
The card base was made exactly like yesterday's card, except I changed the zig-zag border to a scalloped one. The sentiment was also the same, but for some reason, that wasn't working for me. I decided to change it to something that was a little slimmer and longer. I cut the ends to resemble ribbon ends. I also changed the placement of the sentiment from the lower right corner to the center of the card. This is only the second rosette that I have ever made and I think I am addicted. (The first was on the December card a few days ago.) They are just so easy to do and it only takes a piece of paper. Gotta love that!
The final thing was to add a simple shoestring bow that I dyed, again using the Distress Inks. One tip is that if you want a solid dyed ribbon, lay it down and run your dabber across the surface. If you hold the ribbon in your hand to do the crinkle type of ribbon, it gets splotchy. Dye it straight first, then crinkle it to dry. And it only takes about 15 minutes to dry.

Well, I hope you have enjoyed my latest Halloween card. I think I am done now and will be shifting my gears to a few fall things, but mostly Christmas. I never seem to give myself enough time to get all of my projects done. I usually have to carry over a couple from each year. Maybe, if I am a really good girl, Santa will bring me a stocking full of my finished projects. A girl can wish, can't she?
Monday, October 24, 2011
Just Keeping It Real
I just wanted to let you know that I appreciated all of the comments on my room being so neat and clean. But, just to keep it real, this is what it really looks like when I am working on something. I usually don't have a vacant spot on my desk and I start to turn and put things on the computer desk beside me. So, don't be fooled by the cleanliness that you saw the day I finished moving the room. This is really what my creative chaos looks like. I am sure yours never looks like this. lol...Just trying to keep it real.

This is the Halloween card that I was working on that created that big mess. I printed the text pattern paper from a free online download from here. I cut it down to 5x7 which is the size of my card front. The chevron and black dot paper is from the Teresa Collins Haunted Hallows collection. I cut them into 1 inch strips and punched the dot one with a Martha Stewart craft punch. I then sewed the two together using a zig-zag stitch on my machine.


This is the Halloween card that I was working on that created that big mess. I printed the text pattern paper from a free online download from here. I cut it down to 5x7 which is the size of my card front. The chevron and black dot paper is from the Teresa Collins Haunted Hallows collection. I cut them into 1 inch strips and punched the dot one with a Martha Stewart craft punch. I then sewed the two together using a zig-zag stitch on my machine.

The 31 October is a sticker from the same TC pack. The witch face is a punch out from the kit that I inked the edges and pop dotted for added dimension. The bat is Tim Holtz grungeboard shape that I inked black and added black glitter while still wet. Once it was dried, I glued it to the center of a seam binding bow that I dyed black using Distress Stains. (I love this stuff!!!) And lastly, the Happy Halloween was stamped using the Studio Calico Label stamps and punched with the matching EK Success Label punch. I then stamped Happy Halloween from an old Purple Onion Designs seasonal stamp.

Subscribe to:
Posts (Atom)